viernes, junio 26, 2009

GIMP - An Introduction


Enviado por luishernando a través de Google Reader:


vía Digital Photography School de Peter Carey el 25/06/09

wilber_the_gimpMany DPS readers have requested more and more information about GIMP (sometimes referred to as The Gimp) photo editing software.  As a freely licensed bit of photography software, the high interest is understandable.  Before diving into some specific GIMP tips and tricks in future posts, I'd like to help bring those up to speed who may, after reading this far, still be thoroughly confused about what exactly I'm talking about.  What this introduction will not be is a comparison between Photoshop and GIMP, but merely a stand alone introduction to the software you may find useful.

GIMP 1GIMP is a an attempt at answering the call for freely distributed image editing software.  While Photoshop is widely regarded as the industry standard for all kinds of image manipulation, it's costly and overblown for the average photographers use (ok, so I let in a *little* comparison).  Yes, Photoshop has a ton of useful tools, support and plugins available, but it was never available for Linux operating system users until the introduction of Wine.  And it was those users of Linux who initially requested something to run on their operating system to manipulate photographs.

GIMP's history, ancient history and prehistorycan all be read on the official Gimp website, so I won't get deep into where it came from.  It's now available for Linux, FreeBSD, MacOSX and Windows operating system.  Not only that, but it's lightweight enough to fit on a USB jumpdrive via PortableApps.

gimp2
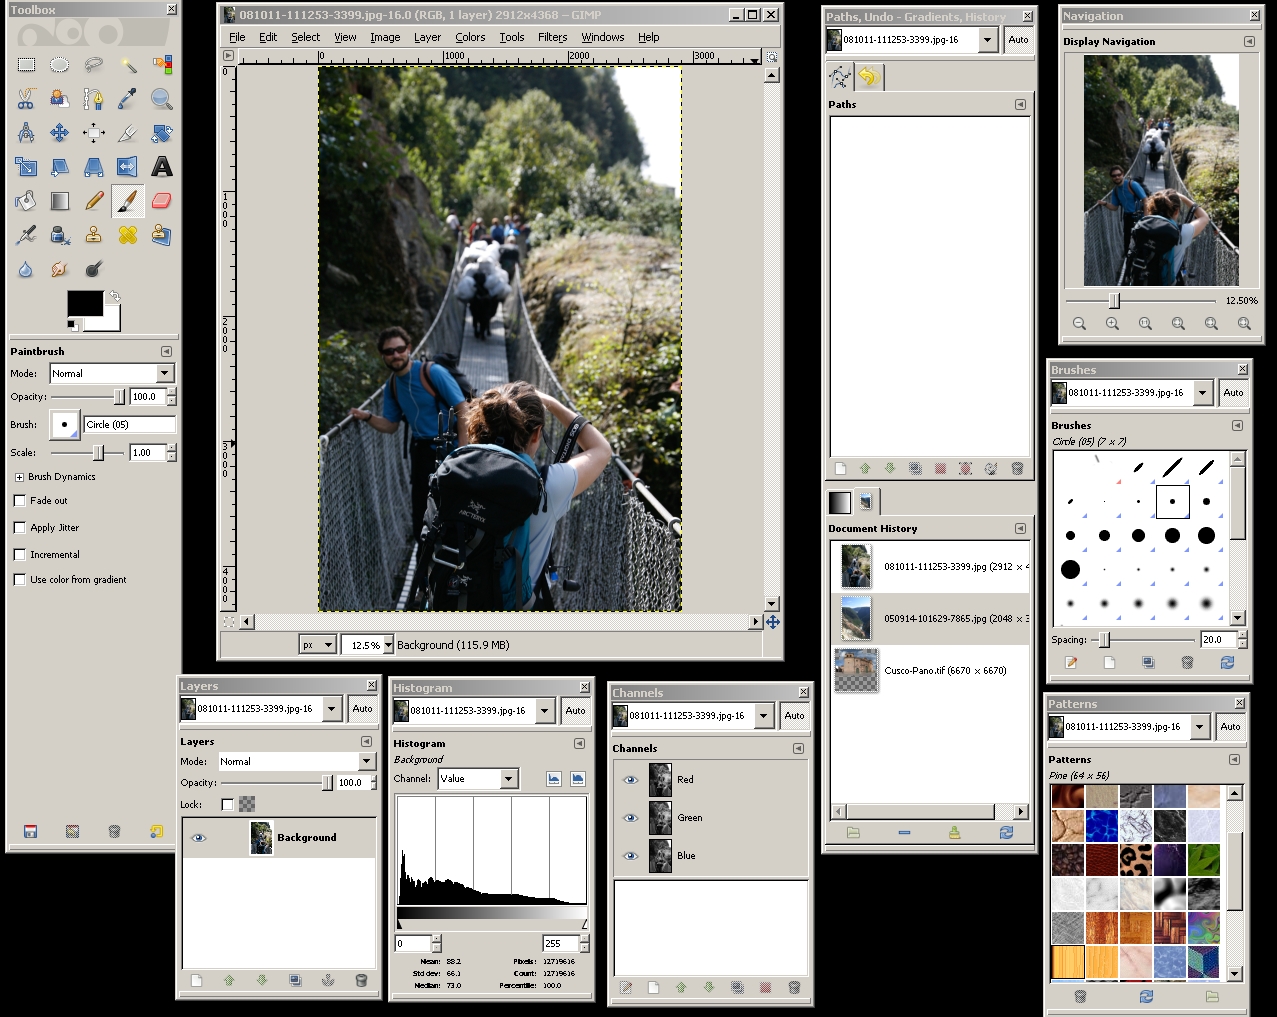
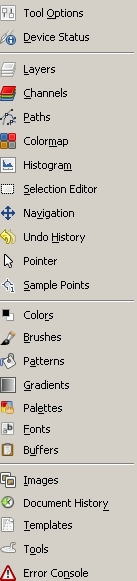
GIMP's program elements, or dialogs,  can float anywhere on the screen.  This gives the freedom to position, resize and customize the feel depending on the task at hand.  The screen shot above (click to enlarge) shows some of the dialogs all spaced out on a desktop.  You will notice there are two larger columns to the left and right of the main image, these are the docks.  If you perfer to have your dialogs tabbed, they can be placed in the docks to help clear things up.  Each dock comes with two panels each and the dialogs can be moved and arranged with drag and drop simplicity.  A list of the available tabs/dialogs is always at hand in each of the docks (pictured at right).

gimp3
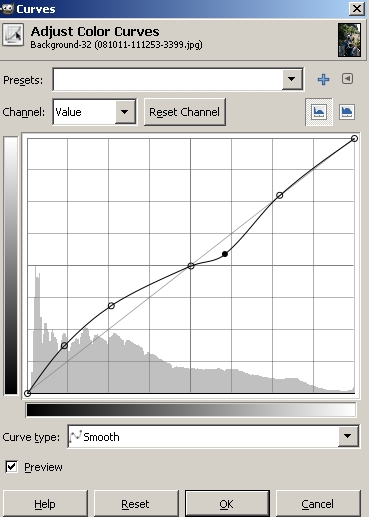
GIMP has many useful photo editing tools such as the ability to make quick crops, rotation, and color adjustments.  It also has more finite controls like curves, hue, saturation, channel mixing, layers, masking, sharpening, clone, heal and levels.  It can handle a wide range of file types including JPEG, TIFF, PSD (Photoshops native file format), GIF and more.   The program is also highly extendable and has a huge library of freely available plug-ins listed on the site.

To get started, you will first need to download GIMP depending on your computer operating system.  The download page can be found here.  After the download and install process starting GIMP will bring up the main image window and the docks previously mentioned.  If you are familiar with Windows or the general concept of windowed programs is familiar to you, GIMP may seem a bit odd at first, the way it just falls onto your screen without any kind of background to anchor it all together.  Depending on what you have going on, you may need to reduce the other programs on your computer to get a clear view.


Opening an image is as simple as clicking on File and then Open, then selecting the file you wish to edit.  You may also drag an image into the main window in GIMP or to the Dock in MacOSX to open it.  This includes images from a website or other program.  Now it's time to start playing!!  First, take a look at the Toolbox pictured here at right. gimp4
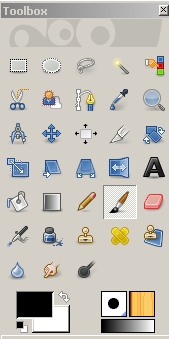
This is one of the main dialogs you'll want to keep handy.  For a quick run down of the buttons, left to right, top to bottom:

  • Rectangle Select Tool - Select a rectangular region
  • Elipse Select Tool - Select circular regions
  • Free Select Tool - Lets you draw around objects
  • Fuzzy Select Tool - Selects areas based on like colors
  • Select By Color - Pick a color, any color!
  • Scissor Select Tool - Select using intelligent edge selection
  • Foreground Selection Tool - The name says it all
  • Paths Tool - Create and Edit Paths
  • Color Picker - Set the color (those big black and white rectangles at the bottom of the toolbox) by picking from the image
  • Zoom Tool
  • Measure Tool - Cool for finding exact pixel distance
  • Move Tool - Use this after a select tool to move image areas
  • Alignment Tool - Align various layers with ease
  • Crop Tool - Super handy and easy to use cropping
  • Rotate Tool - Rotate a layer by exact degree or freehand
  • Scale Tool - Make things bigger or smaller by percentage
  • Sheer Tool - Adjust image for perspective on the sides
  • Perspective Tool - Adjust front to back perspective, or keystoning
  • Flip Tool - Make left be right
  • Text Tool - Add some words any way you like
  • Bucket Fill - Use this after a select tool to fill a selection with a given color
  • Blend Tool - Fill with a gradient
  • Pencil Tool - Painting using a hard edge brush
  • Paintbrush Tool - More smooth than the pencil, just like real life!
  • Eraser Tool - Remove areas using a brush
  • Airbrush Tool - Just like the real thing, with less mess
  • Ink Tool - Another way of brushing with more of a pen effect
  • Clone Tool - Pick an area and duplicate it where ever you like! Good for remove dust spots/blemishes
  • Healing Tool - Heals blemishes by synthesising what should be there
  • Perspective Clone Tool - Two tools in one!!
  • Blur/Sharpen Tool - Use a brush to blur or sharpen select areas
  • Smudge Tool - Just like using your finger to smudge paint
  • Dodge/Burn Tool - Brighten and darken select areas, same as in the old lightroom
  • Foreground/Background Colors - This is where you set colors for many tasks
  • Active Brush, Pattern and Gradient - Lets you know what you've selected

Whew!!  That's a lot and it's just one toolbox!  In future posts we'll dive more into what some of these tools can do, but for now it's time for you to experiment!  Find a photo you've been meaning to crop, highlight or clean up and see just how easy the program can be to use.  Once edits are done, saving the file is the same as any other program in your operating system.  Plus GIMP also has a large selection of file types to "Save As…" if you need to make that PSD a JPEG.

If you've never tried GIMP before and are looking for a good, free, powerful piece of photo editing software, it's worth a look.  I'm not saying there aren't other options out there, but if you're looking to grow into a tool with a lot of advanced features, GIMP is worth your time.  Look for new GIMP tips, tricks and tutuorials coming to DPS soon!

Post from: Digital Photography School - Photography Tips.

GIMP - An Introduction


Cosas que puedes hacer desde aquí:


domingo, junio 21, 2009

Casi en directo, Open video Conference, o el futuro de la participación de t...

caparfazon


Enviado por luishernando a través de Google Reader:


vía El caparazon de dreig el 20/06/09

Tiempos de eventos, sin duda. Open Video Conference, que se está llevando a cabo en NY esta misma tarde,  está entre los que han captado poderosamente mi atención:

Clay Shirky (que al parecer no ha llegado a tiempo pero ha sido exitosamente representado por Jonhatan Zittrain, DVD Jon, Xeni Jardin (Boing  Boing Tv), Amy Goodman,  Lizz Winstead,  el director de RiP: A Remix Manifesto Brett Gaylor y representantes de la Mozilla Foundation, Adobe Systems, Harvard, Stanford y la Universidad de Southern California.

Vídeo abierto… una idea poderosa si la pensamos en el marco de la cultura de la remezcla o en términos de aquello que a muchos nos mantiene en la web: el aprendizaje.

A todos se nos ocurren los tópicos principales de los que trataba el evento, varios problemas al leer estas palabras:

-El primero el de los anchos de banda: Lo comentaba el otro día en las jornadas de Donosti: si no supone encarecer precios (lo cual hoy no es cierto), bienvenido sea cualquier aumento o mejora en ese sentido, porque supondrá ampliar las posibilidades de participación en internet a aquellos colectivos (nativos digitales o no) que se sientan menos cómodos con las tradicionales formas textuales de interacción.

Respondo, en este sentido aquí a la pregunta planteada hoy en  Internet meeting point: lo que quiero para la red y que creo que puede terminar con cualquier sospecha de "vuelta atrás" o limitación de las libertades de las que actualmente disfrutamos,  es principalmente el acceso, la participación efectiva de todos, la disminución de la brecha digital.

"Multiliteracies"  (alfabetizaciones múltiples) o el término que hoy mismo descubría, Electracy…, lo cierto es que necesitamos, en favor de la voz de todos,  nuevos formatos, nuevas posibilidades de interacción, nuevas formas de contar historias (storytelling) en la red.

multiliteracies

-El segundo es el copyright, el gran impedimento para la revolución creativa que todos queremos.

El vídeo se ha convertido casi en un lenguaje habitual, común y más accesible que otros para colectivos desfavorecidos para quienes el teléfono móvil puede ser la única interface de interacción con la red.

Pero su distribución legal sigue siendo similar a la de la televisión: opaca, inmutable y centralizada.

Comentaba Zittrain la práctica habitual de eliminar vídeos de las listas de Youtube (el listado de "desaparecidos" se puede ver en YouTomb).

(escucho mientras escribo, en el evento (#openvideo) y via streaming a @xenijardin: El secreto de boingboing tv está en que no escucha a la gente de la televisión y en que produce vídeos al precio más bajo posible)

Podéis ver, si os queda alguna duda acerca de su potencial para dar voz a los que aún no la tienen, este vídeo que ella misma ponía hace minutos como ejemplo. Guatemala:


Pero ¿Qué es el "Open Vídeo"?

Para Mozilla, algo que requiere de todas aquellas cosas que construyen una internet mejor: Transparencia, control compartido, la oportunidad de participar, la libertad de innovar y remezclar sin necesidad de pedir permiso (Pogo, el re-creador de los fantásticos clips musicales de Alicia, es anónimo, como veíamos hace unos días….)

No son palabras nuevas pero sí aún lejanas para el vídeo:  Flash (adobe), Silverlight (microsoft) son cajas opacas, "incrustadas" en páginas web. Los códecs para crear y distribuir ese tipo de vídeos (como el MPEG, mayoritario y cada vez más caro), son cerrados y protegidos por patentes, convirtiendo la innovación a partir de ellos en algo prácticamente imposible.

El resultado: algo muy similar al  broadcast, a la televisión, a la emisión unidireccional hacia las audiencias, dominado por unos pocos y que limita al máximo cualquier tipo de participación o interacción.

Crear vídeo en la misma lógica de la web requiere tecnologías que la gente pueda mezclar. Y eso es lo que intentan, tanto reproductores libres como VLC (su versión 0.1 ha sido lanzada también durante el evento) como el propio Firefox 3.5, que soporta vídeo nativo y reproduce formatos libres como  Ogg Theora.

También el boceto actual del HTML5 (la actualización del lenguaje básico de la WWW) parece estar estudiando formas de marcado de vídeo dentro de los estándares.

Algunos otros buenos ejemplos, buenas prácticas al respecto son la coleccción de Vídeos Abiertos de Daily Motion, o la intención reciente de  Wikipedia de permitir la colaboración en video-artículos.  OpenSourceCinema.org es otra iniciativa relevante, de entre las muchas presentadas, en ese sentido.

El panorama en cuanto a distribución es casi de monopolio: El mercado de  YouTube en  US es mayor que el de sus 64 mayores competidores juntos. Y esta es una situación que podría mejorar con el crecimiento del movimiento "Open Vídeo":

Las palabras de Adi Kamdar,  de la Open Video Alliance para Wired aclaran un poco más la relaidad y la utopía…:

"Imagino un futuro en el que el vídeo es ubicuo. Todo el mundo tiene acceso a herramientas baratas, incluso gratuitas y estándares abiertos permiten la interoperabilidad entre dispositivos. Es un futuro en el que todos sabemos cómo manipular vídeo y en el que el vídeo es creado, editado, compartido, remixado, citado y archivado  libremente. La participación es la reina y la libre expresión la norma"

Si seguimos como hasta ahora, nos arriesgamos a una futura televisión 2.0. La popularidad de Hulu, de plataformas de vídeo a demanda crece, pero no se trata de entornos dinámicos ni participativos (…) Si continuamos por este camino, seguiremos permitiendo que sean los poderes actuales más que la gente (nosotros), los que determinen cómo se crea y comparte la cultura"

Seguro que cuando vuelva Tíscar, que asistía y retransmitía el evento a través de Twitter, nos explicará aún mejor algunas de las cosas que hemos ido viendo. Os dejo, para terminar, el vídeo que presentaba el evento, aún en curso:

Ampliación, Referencias:

Compártelo: bookmark bookmark bookmark bookmark bookmark bookmark bookmark bookmark bookmark bookmark bookmark bookmark


Cosas que puedes hacer desde aquí:


lunes, junio 15, 2009

Buscador de subtítulos en español


Enviado por luishernando a través de Google Reader:


vía yukei.net de Felipe Lavín Z. el 25/05/09

Hace algún tiempo creé un pequeño invento que me ha resultado bastante útil: un motor de búsqueda personalizada para encontrar subtítulos en español para series y películas, con el ingenioso nombre de Subtítulos en español. Lo puedes encontrar en a través de su complicada URL oficial de Google o más fácilmente a través de http://subs.yukei.net… si te gusta, recuerda que puedes agregarlo como búsqueda rápida a Firefox

Hasta ahora se limita a buscar sólo en seis sitios:

El proyecto está abierto a quien quiera ayudar: puedes enviar sugerencias a través de los comentarios o inscribirte como colaborador en su sitio.

Tags: , , ,

Artículos relacionados


Cosas que puedes hacer desde aquí:


Google Wave, todo en uno

tufuncion


Enviado por luishernando a través de Google Reader:


vía TuFuncion de manu el 28/05/09

Google ha presentado Google Wave que como su "ola" de información equivalente a comunicarnos con chat, email, documentos, fotos, vídeos, mapas y mucho más...

Es la respuesta a aquellos a los que les costaba vivir entre tantas formas distintas de comunicación, muchos se decantaban por el email, otros por el chat y otros por documentos... pero ahora la apuesta de Google es muy fuerte nos proponen tener todo esto en una sola aplicación.

¿Cómo funciona?

Pues de la misma manera que ahora escribimos un email o comenzamos una conversación de chat ahora podremos crear una "ola" y sumar a los amigos a que participen en ella pudiendo usar textos formateados, fotos, gadgets y hasta feeds de otras fuentes en Internet. Los usuarios pueden insertar y responder en la ola directamente y editar textos en forma simultánea, mientras ven lo que otros están escribiendo. Esto significa que Google Wave funciona tanto para mensajes instantáneos como para contenido, facilitando la colaboración y la comunicación.

Google Wave también puede ser considerado una plataforma con un paquete de APIs abiertas que permiten a los desarrolladores insertar olas en otros servicios Web y crear nuevas extensiones que funcionen dentro de las olas.


<!--break-->
Mi opinión es que puede que sea una aplicación demasiado ambiciosa, con esto quiero decir que por mucho que Google intente innovar estas funcionalidades deben de ser seguidas por los usuarios y que en este caso se trata de abarcar demasiado, por ello puede que el usuario no se sienta agusto en la aplicación por la gran multitud de opciones, pero habrá que ver cómo es la experiencia de usabilidad de Google Wave.

Aún no está disponible pero en wave.google.com puedes inscribirte para que te avisen con las novedades.


Cosas que puedes hacer desde aquí:


¿Han cambiado tanto las cosas?

blogoff


Enviado por luishernando a través de Google Reader:


vía blogoff de Kids el 13/06/09

En Microsiervos comentan la primera mención a la palabra "Internet" en el periódico La Vanguardia. Es en el siguiente artículo:

El artículo que data de 1990 no tiene precio. En él Howard Rheingold decía:

Por ahora nadie controla el funcionamiento de Internet (la mayor red de redes del mundo) ni la mayor parte de la información que circular por las carreteras electrónicas del planeta. Los ciudadanos han de organizarse e impedir que los gobiernos y las grandes empresas aniquilen este enorme potencial democrático. Si lo conseguimos, esta tecnología cambiará la naturaleza del discurso político y la estructura de la sociedad. Cada usuario será una voz y un editor en potencia de información.

20 años después la batalla aún dura

¿Necesitas hosting? en Hostarting podrás comparar los planes de hosting de las principales empresas del país, podrás conocer la opinión y valoraciones de otros usuarios sobre los servicios de hosting que utilizan.

Promociona tu web con BetaBlocks (www.betablocks.com).


Cosas que puedes hacer desde aquí:


LetMego sale al aire: un novedoso emprendimiento para el mercado de la indus...

PulsoSocial


Enviado por luishernando a través de Google Reader:


vía Pulsosocial de Lina María Ceballos el 8/06/09

Después de 18 meses de un arduo trabajo, ha salido la versión beta limitada de LetMego. Un emprendimiento colombiano con visión global, que ofrece una novedad nunca antes vista en el mercado de la industria hotelera dentro de la web: se trata de la posibilidad de que los viajeros presenten su itinerario y reciban diferentes ofertas de alojamiento.


Cosas que puedes hacer desde aquí:


Creating Panoramas With hugin Photo Stitcher

Digital Photography School


Enviado por luishernando a través de Google Reader:


vía Digital Photography School de Peter Carey el 10/06/09

hugin-icon Recently I posted the article 8 Guidelines To Taking Panoramic Photos With Any Camera followed by 20 Great Stitched Panorama Examples, both of which garnered a fair amount of "But what do you use to create them?" questions.  While I have typically used commercial ($$$) software, a number of readers pointed out the virtues of a freeware program called hugin.

I'm all for using free software when available but at times it can be lacking compared to commercial counterparts.  I'm very pleased to report this is not the case with hugin.  Robust beyond my simple means, this program should be in every digital photographers virtual toolkit.  It's easy to use, has a lot of room for manual modification and produces excellent panoramic images.

This post will center on the insanely simple task of creating a panorama from pictures shot with a Canon SD630 point and shoot camera.  While the program has many advanced features, I'd like to show just how easy it is to get started creating panoramas on your computer.  And one great thing about hugin is it works on Windows, Mac OSX and Linux!  Screen shots for this demonstration will be done on a PC.  Let's get started!!

First, you'll need to download hugin.  The download page can be found here.  After downloading, install the program according to your operating system's instructions.  Upon starting up hugin (and clearing the hints pop-up) you will see the simplistic screen below. (click image for full size view)

Start page

It's simple and ready to go out of the box.  Click "1. Load images…." and a file selection box will appear.  Simply click on the first photo in the panorama set, hold down <shift> and click on the last photo you'd like included.  Then click "Open" (I know, Windows is still backwards that way as you're not really opening anything, just selecting).  Your images will be loaded and checked for lens type, camera type , focal length and focal length multiplier. 

Just a few steps left!! Click "2. Align…." and hugin will start a process to evaluate your images and find control points.  Control points are points found in an image that hugin can identify as mostly unique.  It uses these control points to match up photos.  In the 8 Guidelines post I mentioned an ideal overlap of 30%.  This is where that overlap comes into play.  The more overlap, the more control points hugin can match between the two images and correct for camera orientation or lens curvature.  This step is automated (and you can go back later to select or remove your own control points) and a new screen will pop up telling you how many points were found, like this:

finding control points

Depending on a number of factors such as computer speed, file sizes and location, number of images selected and available processor power, hugin will chug through your pictures one at a time.  At this point, if you have a lot of data to crunch, it might be a good time to go grab a bite to eat or get some other work done.  The panorama I am using as my example, which contains 12 images taken with a 6MP point and shoot, took about 15 minutes on a 2.8GHz Windows XP machine, for what that's worth. 

When hugin is done, it will tell you how many points it can connect and if it thinks things will work well.  If there aren't enough points, you may have to set some manually.  To do this, click on the "Control Points" tab, then select an image for each window (left and right) for which you want to match points.  If hugin has found some points already, you'll be greeted with a very colorful window like this:

control points tab

Now, click on any point on the left image.  Hugin will zoom in allowing you to more precisely position the crosshairs on your target.  Once elected, hugin will attempt to find the same spot on the image in the right window, displaying its best guess.  If that guess is not good enough, manually click and drag the crosshairs to the desired spot.  This zoom gets down to a pixel by pixel locating and can be very precise.  Click the "Add" button on the bottom right of the screen and your new points are added (you an also check the box  for "auto add" if you find hugin is doing a good job of matching your selections and don't wish to click "Add" each time).

It's time to click back to the "Assistant" tab and let hugin create your panorama!!  Click on "3. Create panorama…." and after you tell hugin where to save the finished file, you'll get another screen letting you know the status of the process.  It can have some crazy stuff as seen below:

doin' the stitich

And that's all there is to it!! Ok, there's actually one more step depending on the output of the file.  In the most basic mode, you will still need to crop the image.  Initial output will look something like this:

Uncropped

I personally like having more control over my crop and don't mind this raw stitch look.  It's fairly simple to import the image into my favorite photo editing software and crop to my liking.  It also gives options to change things up a bit as seen in the final image options below:

Crop1 crop2

And there you have it!  Panoramas made easy and free!  Hugin has a wealth of tools to help manipulate the stitch process including the ability to auto level for exposure and angles.  Luckily the folks who have worked on hugin have also put out a good users manual, located here, that will help explain the ins and outs of all the tabs and tools in hugin.

If you're looking for further encouragement on what hugin can produce, check out the flickr tag hugin for over 14,000 examples!

Post from: Digital Photography School - Photography Tips.

Creating Panoramas With hugin Photo Stitcher


Cosas que puedes hacer desde aquí: