Enviado por luishernando a través de Google Reader:


Cosas que puedes hacer desde aquí:
- Subscribirte a I Can Has Cheezburger? con Google Reader
- Empezar a utilizar Google Reader para mantenerte al día fácilmente de todos tus sitios favoritos
Do you believe in magic? Miracles? Life after love? Well prepare to believe! Except for that last one because IT DOESN'T EXIST. This is a video by Grant Thompson of The King Of Random. In it, he shows how to create ice instantly. Not only is the whole concept super impressive, but it's also super confusing. My brain hurts! Here's some smarty-pants explanation per io9:
This is an example of supercooling – the process by which a very pure liquid is chilled to a temperature just below its usual freezing point without actually making the jump to its solid state. Bottled water is perfect for this, especially the kind that's been purified via reverse osmosis, a process that strips water of all its particulates. This particulates can act as "seed crystals," or "nuclei," to which a liquid phase on the cusp of becoming solid can attach, and crystalize around. In this video, a seed crystal is introduced in the form of a cube of already-frozen water. As soon as it's introduced, the liquid phase rapidly crystallizes and attaches to the solid one, kicking off a chain reaction of ice-formation.
So! There you have it: magic. NOT Ice-nine as I originally suspected. Now that the mystery has been solved, if you'll excuse me, I need to lie down before my mind melts.


Este artículo se publicó originalmente en Cooking Ideas, un blog de Vodafone donde colaboramos semanalmente con el objetivo de crear historias que «alimenten la mente de ideas».
Twitter es sin duda uno de los grandes éxitos de los últimos años: más de 200 millones de usuarios activos que envían unos 400 millones de tuits cada día. Vemos los códigos de los hashtags en televisión continuamente, nos asombramos con los trending topics y los personajes que tienen millones de seguidores y a nivel económico el servicio «del pajarito» tiene una valoración tan alta que es sencillamente incalculable.
Sin embargo, no siempre fue así: quienes estábamos por aquí a principios de los 2000 (se lanzó oficialmente en 2006) recordamos haber vivido su evolución, de dónde venía y cómo realizó la travesía del desierto que toda compañía exitosa debe cubrir hasta llegar a su destino. He extraído cinco detalles quizá no muy conocidos que creo que son interesantes para darse cuenta de que las cosas no siempre son tan fáciles como parecen.
1. Los tipos que inventaron Twitter ya habían inventado Blogger antes, además de otros servicios que fracasaron miserablemente. Sí, hablamos de Blogger, el que fuera más popular servicio de alojamiento de blogs hasta que Google lo adquirió y abandonó a su suerte. Curiosamente, Blogger nació como un proyecto colateral de una empresa fundada originalmente para crear videojuegos. Por otro lado, tras dejar Google y fracasar con un sistema de audioblogs llamado Odeo –que era otra de la modas de la época– surgió Twitter, nuevamente como un pequeño proyecto secundario desarrollado como herramienta interna. Moraleja: ni siquiera los creadores de los grandes éxitos saben muchas veces qué va a triunfar y qué va a fracasar.
2. Twitter se hizo muy popular a través de SMS. Cada país tiene sus circunstancias en cuanto a las comunicaciones; aunque en España Twitter se popularizó vía web en Estados Unidos su despegue se produjo entre otras cosas porque era muy popular a través de SMS y porque las tarifas de comunicaciones allí y en otros lugares son notablemente distintas. Lo mismo ha sucedido con otras redes sociales y sistemas de chat como Whatsapp, que donde mayor número de usuarios parece tener es en España.
3. Twitter ni siquiera se llamaba Twitter. Su primer nombre fue Twtrr, en la época de la moda 2.0 de los «nombres sin vocales». Al final acabó con el nombre completo más convencional que ahora conocemos. Otras funciones que tampoco existían y que inventaron los usuario (y no los creadores del servicio): los #hashtags temáticos y los RT (retuits). Y el primer lema para animar a tuitear era «¿qué estás haciendo?» y no «¿qué sucede?» lo cual probablemente ha generado más gerundios en las conversaciones que ningún otro sistema de comunicación.
4. La ballena «fail» fue el cachondeo de Twitter durante meses, si no años. Debido a su espectacular crecimiento, los servidores de Twitter no tenían capacidad para soportar a tantos usuarios simultáneamente; el servicio simplemente se rompía. Con el tiempo cambiaron la pantalla de error por una icónica y surrealista ballena, más conocida como Fail Whale, que se ha asociado con el «morir de éxito» de muchos proyectos. Pero el desánimo no les pudo y años después los ingenieros lograron una arquitectura bastante fiable que funciona sin problemas.
5. ¿Tuits con fotos? ¿Tuits desde el espacio? ¿Hashtags en la televisión? Pocos hubieran podido imaginar todas estas cosas cuando Twitter estaba naciendo «para hablar con los amigos», demostrándose una vez más que el futuro de muchos inventos no esta escrito, sino que depende de los usuos que la gente haga de ellos.


¿Cansado de soportar IE? Te entiendo, pero aún hay clientes que piden que sus proyectos se vean en estos browsers antiguos. Frustraciones aparte, cuando escribes Javascript y usas console.log() para debuggear tu código en la consola del browser, es usual que éstas funcionalidades se quiebren en IE8-.
console.log('IE8- dará error por esto');window.console && console.log('IE seguirá funcionando ahora, pero no mostrará nada en la consola. ¡Se lo pierde!');Verifica si console existe y si es undefined, crea una vacía:
if ( ! window.console ) console = { log: function(){} };Después utiliza console.log como quieras, no entregará error en IE:
console.log('IE seguirá ignorando console.log');Link: Testing for console.log statements in IE | StackOverflow
From the same folks that brought us Star Wars: A New Hope in 60 seconds!
When the Moore tornado struck Oklahoma two days ago, Youtuber Charles Gafford filmed this footage of the 1.3 mile wide monster from inside a storm shelter. I'm just glad this kind of catastrophe never occured where I live.
[Via iO9]


Full screen! Lights off! Sound up!
Probably the most beautiful time-lapse video I've seen featuring the city of Dubai, and there are plenty out there.
[dimid]
A beautiful, and really, really sad short sci-fi film by Orange, California-based filmmaker Joe Sill.
Female astro-miner Shona has been mining under dangerous conditions on the moon for the past two years in order to pay for expensive medical treatments in hopes of save her bed-ridden daughter Darla, and now that her tour is completed, a younger astronaut Paige has come to replace her. Shona is reluctant to return to the world she once knew, but in meeting Paige realizes that returning to Earth isn't where she'll find peace – she will have to return home.
[Joe Sill]
A Guest Contribution by Anotherphotograpbynoob.com.
What this tutorial will show you
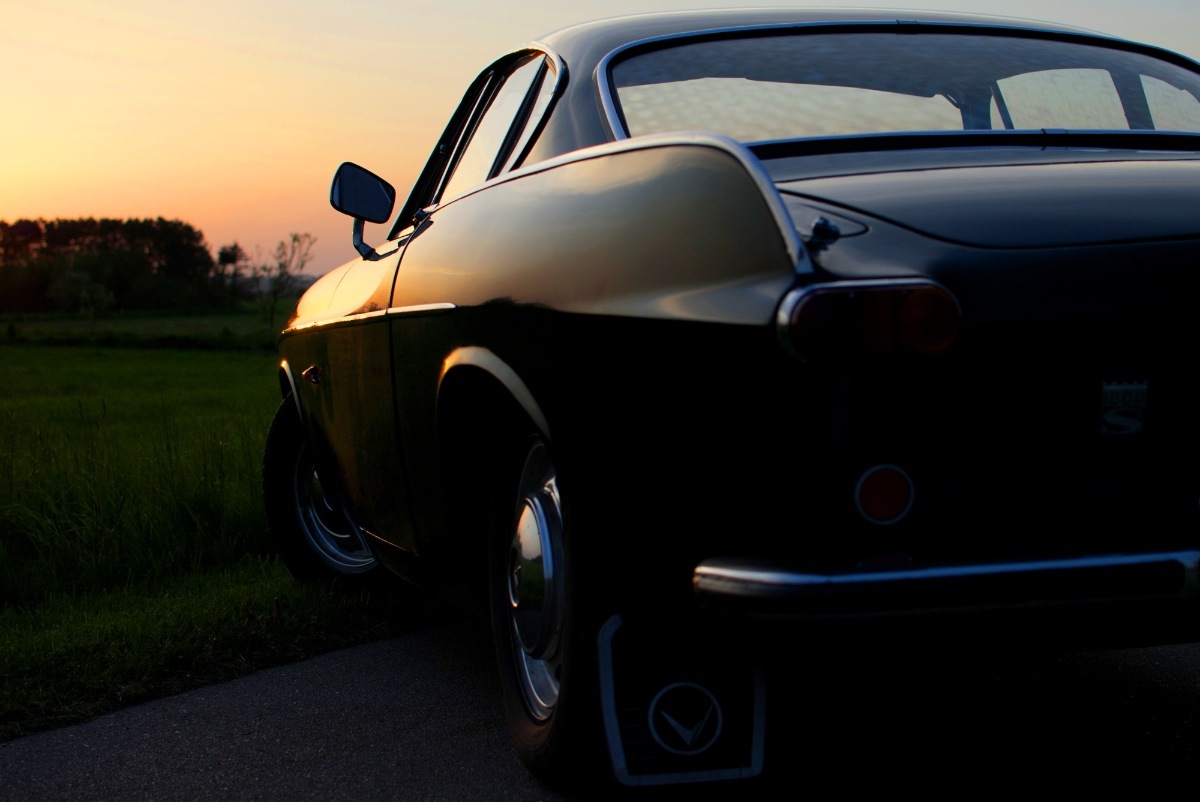
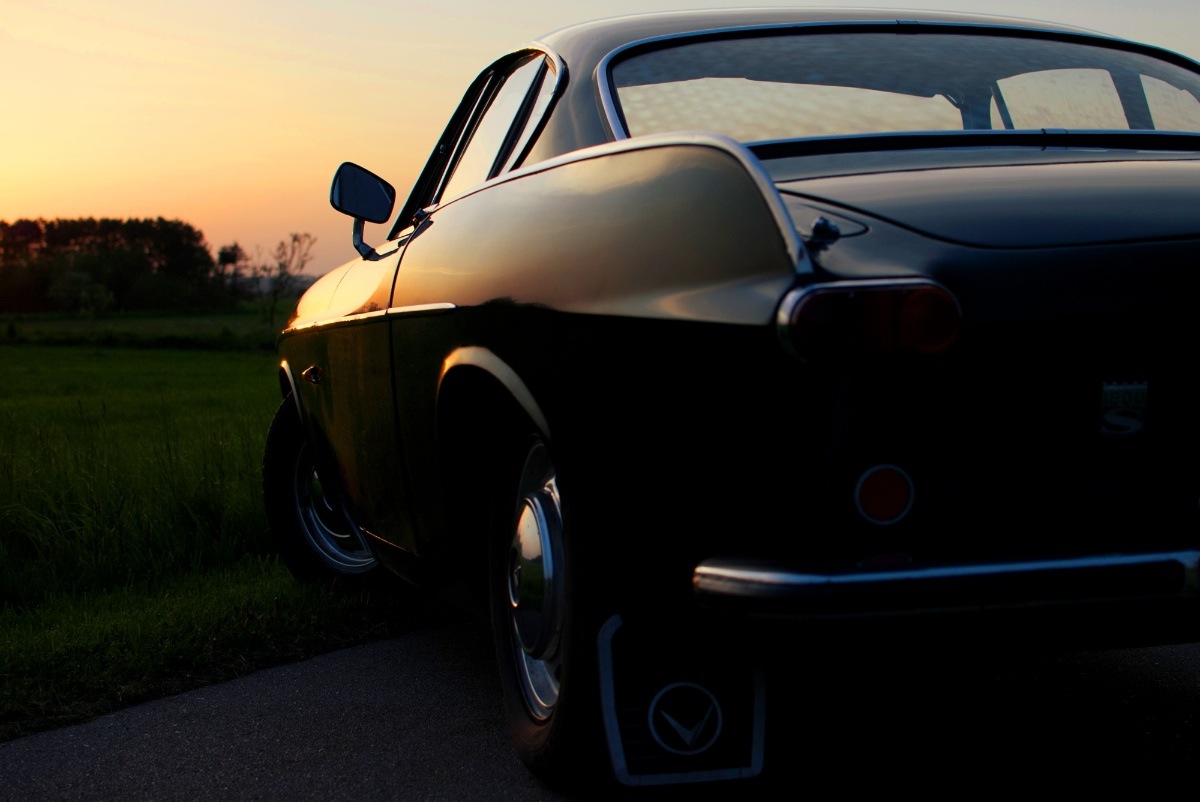
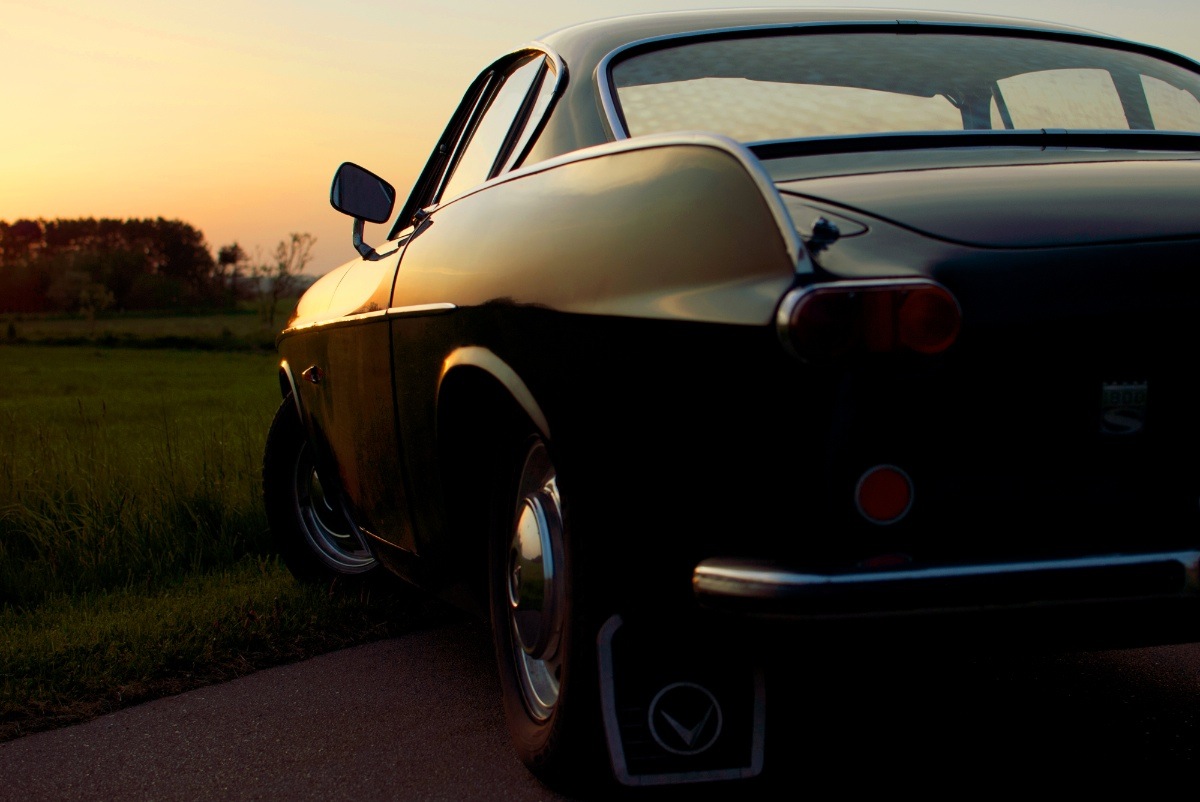
In short: how I made the photo on the right become the photo on the left.
In this tutorial, we will cover basic tools of the free photo editing software GIMP.
Here is a quick rundown of the features covered in this tutorial:
Sound hard? Don't worry. I'll guide you through the whole process, step by step.
First of all, you need to have GIMP installed. Click here to download GIMP, and then follow the instructions provided with the software.
If you want to follow along with me in this tutorial, the original photo can be downloaded here. I shot the photo myself last year. The sportscar is a racing green Volvo P1800, just like the one Roger Moore drove in The Saint – yep, my dad tells me the story every time we ride in that car.
You are free to use the photo for whatever you may want, as long as it isn't illegal of course.
If you are interested in the specifications of my camera, it is:
Enough with the anecdotes; let's start editing.
After you have started up GIMP, open up the image you want to edit. If you have chosen to follow along and you haven't changed too much in the standard layout in GIMP, it should look like this.
The first thing I want to fix is how I composed the image. I don't like the license plate showing in the original photo. Ideally, I would like to see no license plate and at the same time as much as possible of both the car and sky.
The easiest way would be just cropping off the right of the photo until the license plate is gone.
But…
I know my mother will most likely print this photo – just as with all the other photos I've sent her. In order to make the process of printing the images as smooth as possible, I need to keep the proportions of the image in tact (I don't want the print service computer system to decide how the photo is cropped).
With that in mind, choose the Crop tool from the toolbox on the left (Shortcut Shift + C).
To make sure proportions are kept, check the box labeled Fixed. From the drop-down menu, you should select Aspect Ratio and the value should be set to current. Like this:
Now you can drag out the area you want to keep. You can adjust it by dragging the corners around the image. When you are satisfied, hit enter and your photo is cropped.
So far, so good. The image is still dull, I know. Let's get moving.
When you open up a photo in GIMP, a background layer will be created automatically. Don't edit directly on that. Instead, you should make a copy of the layer by pressing Ctrl + Shift + D (Mac: Cmd + Shift + D).
Now you have the original background layer for reference while editing, and no matter the mess you make, you can easily start from scratch.
And now we must go back to the sports car!
The first thing I want to do is increase the contrast. This is mainly to darken the ugly details on the back of the car, in order to let the more shiny parts sparkle.
First, open op the Levels panel Color > Levels:
I've made a simple move. I just increased the darks by 10 and kept the whites at 255. I kept the whites at 255 to ensure most details are preserved in the sky; we've now set the best base for boosting the color of the image.
The first panel I use in this process is Adjust Hue/Lightness/Saturation.
Go to Colors > Hue-Saturation:
I won't be explaining every panel I use in detail. Instead, I'll focus on the settings I needed for this tutorial. I've only adjusted the master channel in this panel.
Hue
I've increased the hue a little. Six steps up isn't a lot, but you'll easily notice the difference. Increasing the hue removes the slight magenta shade in the sky.
Lightness
Even though I adjusted the Levels before, I want an even more warm and dark feeling. Almost like a classical sunset-silhouette – just keeping the details in the photo.
By decreasing the Lightness, I darken the photo and turn up the colors even more in the sky. The Volvo P1800 even starts looking right with dark green colour (the actual name is British Racing Green – another dad anecdote).
Saturation
The final step in the Hue-Saturation panel is increasing Saturation – a lot! I'm putting the pedal to the metal now. All in on sunset.
This is much better. But, I want to adjust it a little bit more. Next stop: the Color Balance panel.
Go to Color > Color Balance:
Again, I'm not going into detail on all functions. Just the ones I altered. In this case, it's the Color Levels of the Midtones.
Cyan <> Red
Everything got a little too blue when I boosted Saturation – especially the car. The first step is decreasing Cyan (by increasing Red). Now the car is getting warmer.
Magenta <> Green
One step down is not doing much, but I really think it helped. It needed some compensation after increasing Red and Yellow.
Yellow <> Blue
Let's add even more color to the sky and some warmth to the chrome on the car.
I still don't like the blue shade on the chrome. The last step is to add a color filter. It's really simple.
First, add a new transparent layer. Just go to Layer > New Layer (Ctrl + Shift + N).
Name the layer "Warm Color Filter." Choose a transparent layer and click Ok.
Now select the foreground color and set it to #F4B905. Actually, I just went for a warm orange and landed on this. Not freakishly important. Just go for a warm orange color.
Select the Bucket Fill Tool (Ctrl + B) and fill your new transparent layer with warm orange.
This should turn your entire image warm orange. Looking great, ay?
Ok. Now change the layer opacity to 10%, and set the blend mode to Dodge.
The result is a nice and warm feeling to the overall photo. And it also got us rid of that blue trouble in the chrome details. Nice.
As you may already know, GIMP does no longer save in JPEG. But don't worry, the good people working with GIMP has just moved the function a bit and it is now called Export (Ctrl + E) and Export As (Shift + Ctrl + E), if you need to rename the file.
My mom actually ended up printing all the photos of my dad's sports car. If you want to check out the rest of the sports car photos and even more GIMP tutorials, head over to my blog at http://anotherphotographynoob.com.
More specifically, the images of the sports car are here: http://anotherphotographynoob.com/sportscar/
And all my tutorials for GIMP are here: http://anotherphotographynoob.com/gimp-tutorial/
Anotherphotographynoob is a European blogger and photo enthusiast, blogging daily at Anotherphotograpbynoob.com. It all started as a simple blog posting a photo a day, but recently the blog has moved to a self-hosted solution and now tutorials are being written on a daily basis to help other photo nerds.
Post originally from: Digital Photography Tips.
Check out our more Photography Tips at Photography Tips for Beginners, Portrait Photography Tips and Wedding Photography Tips.
Make your Photos Sparkle with GIMP